| Content |

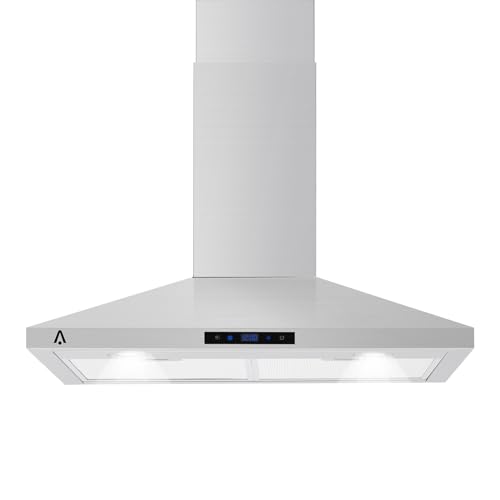
Elevate your kitchen with the ThinkMax 30 Inch Wall Mount Range Hood
ThinkMax 30 Inch Wall Mount Range Hood: Modern Efficiency Meets Style
Transform your kitchen ventilation with our powerful 265 CFM range hood. Designed for performance and elegance, it's the perfect combination of functionality and modern aesthetics.
Why Choose ThinkMax?
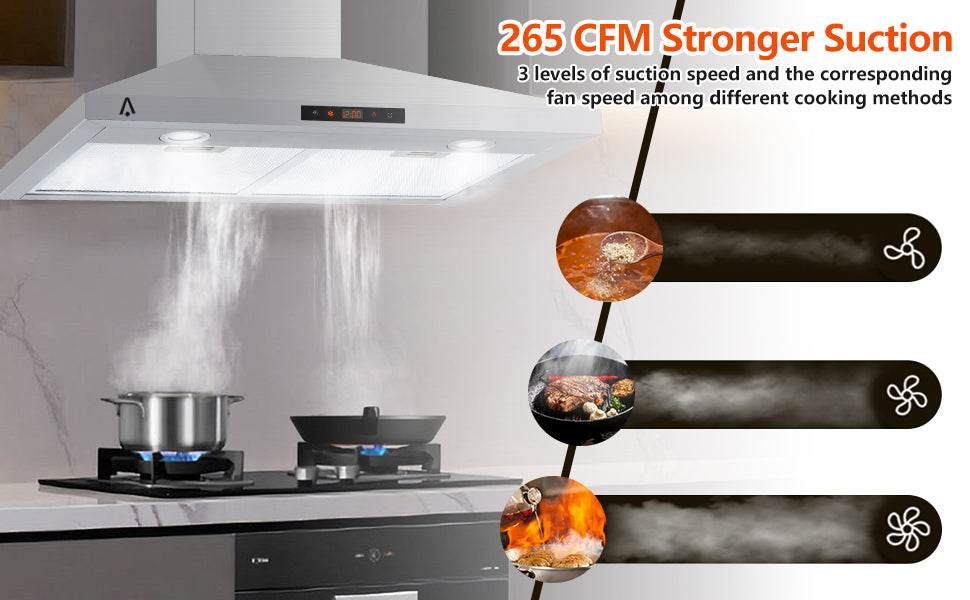
Powerful Performance
265 CFM suction power effectively removes smoke, odors, and cooking fumes, keeping your kitchen fresh and clean.
Premium Construction
Built with high-quality stainless steel for durability and easy maintenance, ensuring long-lasting performance.
Smart Controls
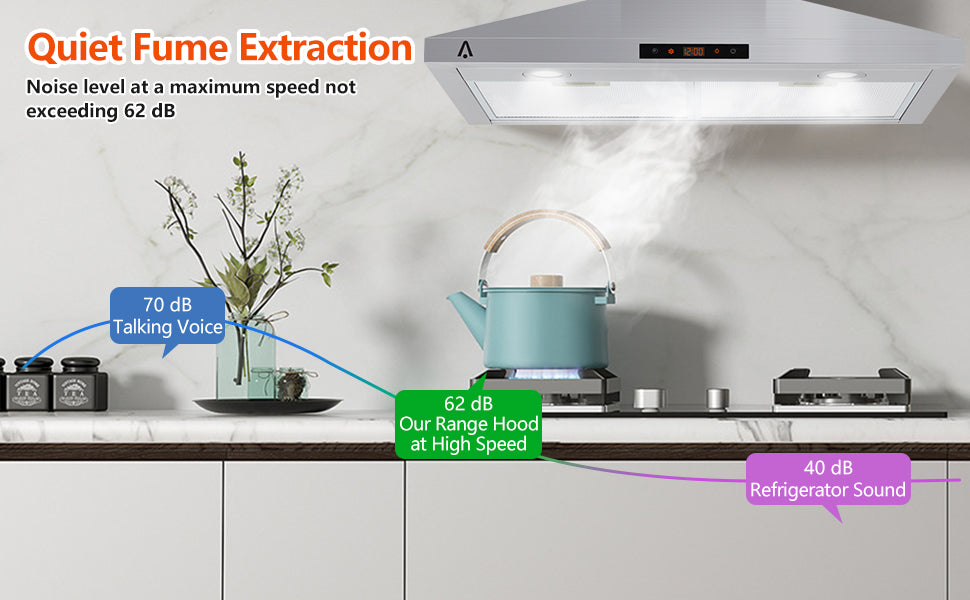
3-speed touch control system with quiet operation lets you adjust ventilation to your exact needs.
Superior ventilation with modern touch controls
Features That Perform
With its sleek design, powerful suction, and quiet operation, this range hood combines performance with convenience. The stainless steel construction ensures durability while maintaining an elegant appearance.
Versatile installation options for any kitchen setup
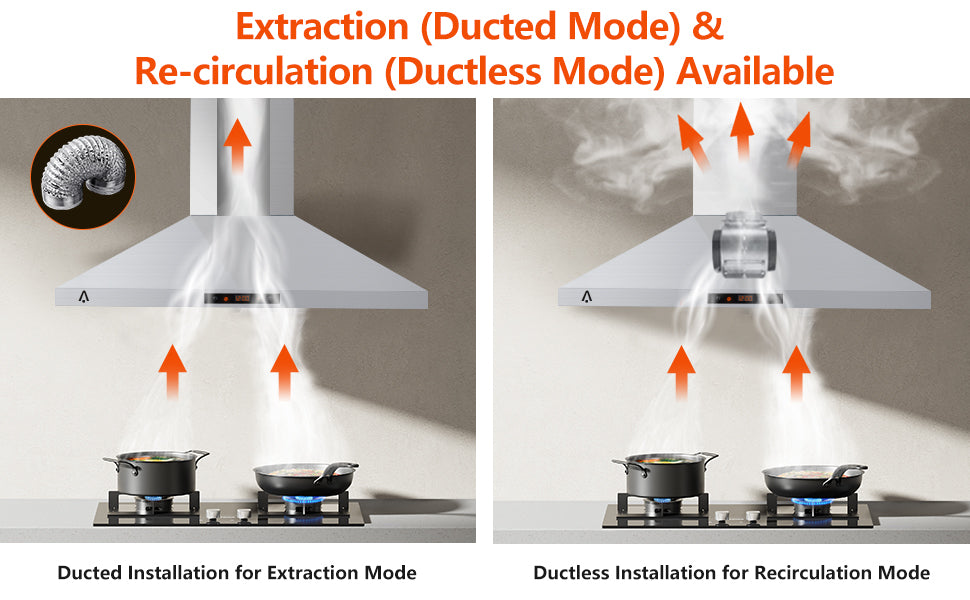
Versatile Installation
The convertible ducted/ductless venting system provides flexible installation options to suit any kitchen layout. Bright LED lighting ensures optimal visibility while cooking.
Perfect dimensions for standard 30-inch cooktops
Smart Design Meets Superior Function
Every detail has been carefully considered, from the efficient 265 CFM motor to the touch control panel and LED lighting system, creating the perfect balance of form and function.
Key Features
- Powerful 265 CFM suction for effective smoke and odor removal
- Premium stainless steel construction for durability
- 3-speed touch control with quiet operation
- Convertible ducted/ductless venting options
- Bright LED lights with dual brightness levels
- Easy-to-clean design and maintenance
- Modern aesthetic that complements any kitchen style
Experience superior kitchen ventilation
Specifications
| Brand |
ThinkMax |
| Noise |
60 dB |
| Color |
Silver |
| Voltage |
110 |
| Airflow Displacement |
265 Cubic Feet Per Minute |
| Material Type |
Stainless Steel |
| Special Features |
Stainless Steel Baffle Filters, 3 Fan Speeds, LED Lighting |
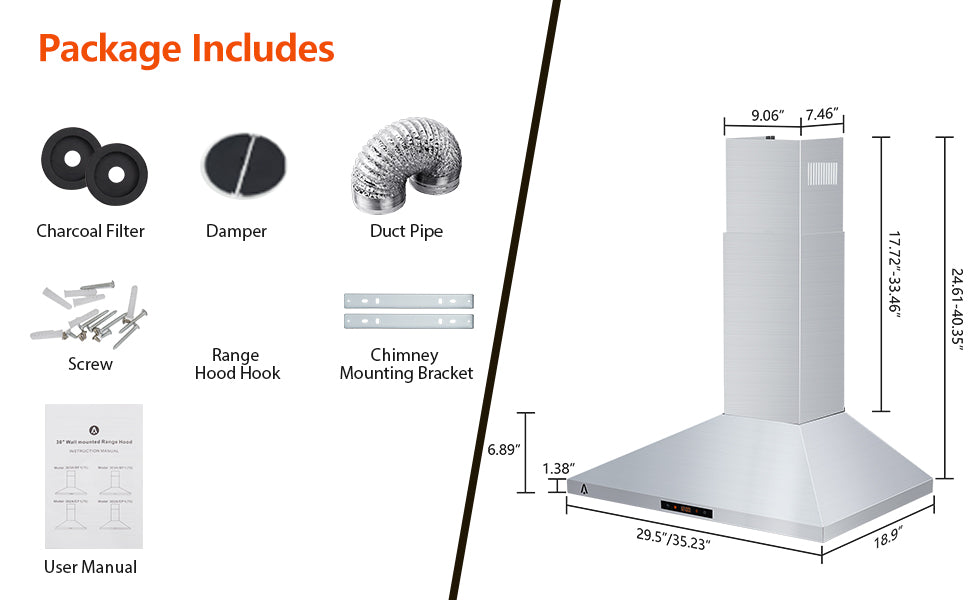
| Included Components |
1x Range Hood, 1x User Manual |
| Product Dimensions |
18.9 x 25.9 x 6.89 inches |
| Item Weight |
19.84 pounds |
|

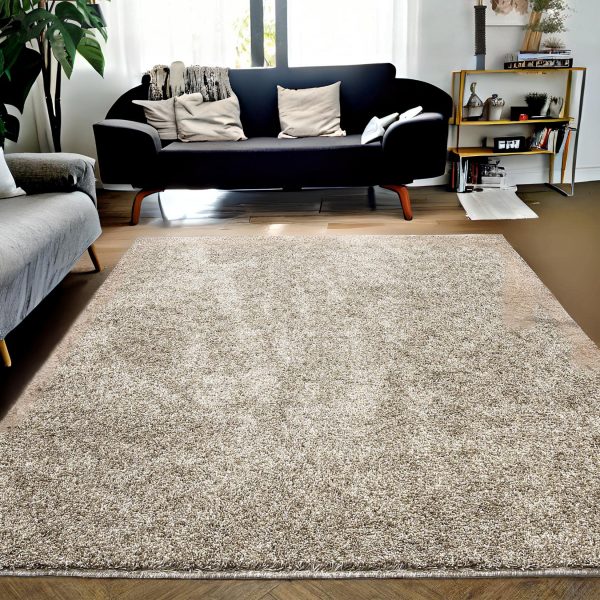
Fabricado con fibras de felpa de alta densidad de 1100GSM, ultra suave y esponjoso. La superficie gruesa de felpa de la alfombra proporciona la m??xima comodidad y una sensaci??n lujosa bajo los pies, por lo que es perfecta para descansar y relajarse. La superficie de felpa de nuestra alfombra puede soportar el desgaste regular de ni?os y mascotas, y es f??cil limpiar derrames o desorden. Dise?ado con miles de puntos de goma que la hacen ideal para suelos de madera u otros materiales, ayuda a que la alfombra se mantenga en su lugar y evitar resbalones y ca??das. Small
Parte trasera antideslizante
Apto para ni?os y mascotas
Entendemos que una alfombra no es solo una decoraci??n, es una inversi??n en la comodidad y el estilo de tu hogar.
Es por eso que nos comprometemos a crear alfombras que no solo se vean geniales, sino que tambi??n resistan la prueba del tiempo.
Nuestra alfombra moderna ThinkMax est?? hecha de materiales duraderos, est?? dise?ada para soportar el tr??fico pesado de pies y mantener su belleza durante a?os.
Ya sea que est??s buscando a?adir un toque de elegancia a tu sala de estar, dormitorio o comedor, la alfombra lavable es la elecci??n perfecta.
Es lo suficientemente vers??til como para complementar una variedad de estilos de decoraci??n, desde cl??sicos hasta contempor??neos, y ser?? la pieza central de cualquier habitaci??n.
Specifications
| Brand |
ThinkMax |
| Size |
11 x 15 FT |
| Material |
Polyester |
| Weave Type |
Machine Made |
| Item Weight |
97.8 pounds |
| Pile Height |
Medium Pile |
| Construction Type |
Machine Made |
| Back Material Type |
Rubber |
| Color |
Natural |
| Indoor/Outdoor Usage |
Indoor |
| Theme |
modern |
| Is Stain Resistant |
No |
| Product Care Instructions |
Machine Wash |
| Pattern |
Solid |
| Shape |
Rectangular |
| Special Feature |
Fluffy, Non Slip |
| Room Type |
Living Room |
| Product Dimensions |
180"L x 132"W |
| Rug Form Type |
Area Rug |
| Style |
Modern |
| Number of Pieces |
1 |
| Model Name |
Area Rug |
| UPC |
196336129840 |
|
Specifications
| Product Dimensions |
37.79 x 32.68 x 22.44 inches |
| Item Weight |
42.9 pounds |
|

?Por qu?? la alfombra es tan importante para nuestro hogar?
Las alfombras son una forma segura de agregar color y textura a cualquier habitaci??n. Una alfombra puede anclar una habitaci??n, definirla, agregar calidez y ayudar a colocar la decoraci??n de una habitaci??n. Una alfombra gr??fica y moderna es suficiente para crear todo un mundo propio, mostrando nuestros muebles.
Cuando est??s en casa, la comodidad es clave. Las alfombras son una de las formas m??s sencillas de agregar un mayor nivel de comodidad a su hogar.
Adem??s, el valor de seguridad que proporcionan las alfombras no debe pasarse por alto. Las alfombras gruesas pueden amortiguar tu ca??da, lo que reduce el riesgo de lesiones. Tener alfombras gruesas es especialmente ??til si tiene ni?os peque?os que tienen m??s probabilidades de correr y tropezar.
La amortiguaci??n que ofrecen las alfombras tambi??n es una consideraci??n ??til si tienes un beb?? en casa. Cuando los beb??s est??n aprendiendo a caminar, es com??n que se caigan; tener una alfombra gruesa y suave es una excelente manera de mantenerlos lo m??s seguros posible.
ThinkMax - Alfombra de ??rea de la colecci??n Oriental
Calidad premium
- Tejido a m??quina con fibras sint??ticas duraderas, que son ideales para crear una manera c??moda para que tu familia reduzca el estr??s y alivie los m??sculos cansados
-
Pila baja
-
Dise?o vintage
-
No se desprende
-
Antideslizante
Specifications
| Brand |
ThinkMax |
| Size |
9 x 12 Feet |
| Material |
Polypropylene |
| Weave Type |
Machine Made |
| Pile Height |
Low Pile |
| Construction Type |
Machine Made |
| Back Material Type |
Cotton |
| Color |
Blue |
| Indoor/Outdoor Usage |
Indoor |
| Is Stain Resistant |
Yes |
| Product Care Instructions |
Hand Wash Only |
| Pattern |
Oriental |
| Shape |
Rectangular |
| Special Feature |
Non Slip |
| Room Type |
Living Room |
| Product Dimensions |
144"L x 108"W |
| Rug Form Type |
Area Rug |
| Style |
Modern |
| Number of Pieces |
1 |
| Model Name |
blue912-0Y7GXBK1 |
| UPC |
196336638755 |
| Item Weight |
43 pounds |
|
Specifications
| Brand |
ThinkMax |
| Size |
8' x 10' |
| Material |
Pearl Plush |
| Weave Type |
Machine Made |
| Item Weight |
23.2 pounds |
| Pile Height |
Medium Pile |
| Construction Type |
Machine Made |
| Back Material Type |
Canvas |
| Color |
Beige |
| Indoor/Outdoor Usage |
Indoor |
| Is Stain Resistant |
Yes |
| Shape |
Rectangular |
| Special Feature |
Non Slip, Washable |
| Room Type |
Living Room |
| Product Dimensions |
8"L x 10"W |
| Rug Form Type |
Area Rug |
|

Enhance your space with the ThinkMax Artificial Topiary Tree 2-Set
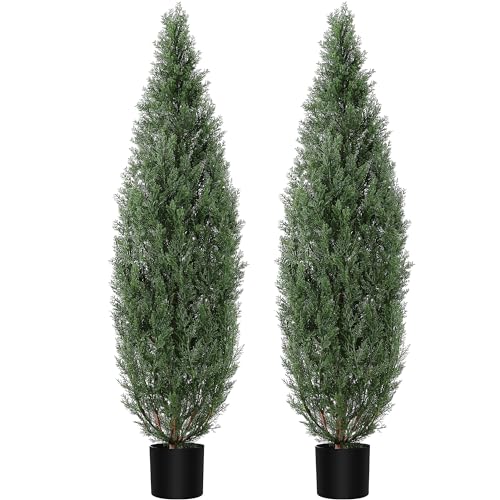
ThinkMax Artificial Topiary Tree 2-Set: Elegance Meets Convenience
Transform your indoor or outdoor space with our stunning 5ft Artificial Cedar Topiary Trees. These maintenance-free beauties offer the perfect blend of realism and practicality, bringing nature's charm to your decor without the hassle.
Why Choose ThinkMax?

Realistic Design
Our artificial cedar trees boast a true-to-life look, fooling even the keenest eyes with their lifelike appearance.

Maintenance-Free
Enjoy the beauty of nature without the upkeep - no watering, pruning, or special care needed.

Versatile Use
Perfect for any setting - from gardens and patios to living rooms and offices, these trees adapt beautifully to any space.

Perfect for both indoor and outdoor decoration
Features That Impress
With their generous size of 60.6 inches in height and 16.3 inches in width, these artificial topiary trees make a bold statement. The 5.7-inch pot provides stability, ensuring your decor stays put in any environment.

Bring a touch of nature to your indoor spaces
Effortless Elegance
The ThinkMax Artificial Topiary Tree 2-Set arrives ready to display, with no assembly required. Simply place them in your desired location and instantly elevate your decor with their lush, evergreen beauty.

Exquisite details for a truly lifelike appearance
Long-Lasting Beauty
Our artificial topiary trees are crafted with UV-protected materials, ensuring they maintain their vibrant green color and realistic appearance for years to come, whether placed indoors or outdoors.
Key Features
- Realistic design with a true-to-life look
- Maintenance-free, no watering needed
- Versatile for garden, patio, home, and office use
- 60.6 inches tall, 16.3 inches wide, with a 5.7-inch pot
- No assembly required, ready to install
- UV protection for longer life and color retention
- Suitable for both indoor and outdoor decoration

Transform your space with the ThinkMax Artificial Topiary Tree 2-Set
Specifications
| Brand |
ThinkMax |
| Color |
Green |
| Shape |
Cedar Topiary |
| Material |
Polypropylene (PP) |
| Tree Height |
60.6 inches (5 ft) |
| Tree Width |
16.3 inches |
| Pot Size |
5.7 inches |
| Suitable Use |
Indoor and Outdoor |
| Special Features |
UV Protection, No Assembly Required |
| Set Includes |
2 Artificial Cedar Topiary Trees |
|


Shinneen Muir –
The 5-layer aluminum filter is a game-changer – it effectively traps grease and eliminates cooking odors. I love how easy it is to clean, simply pop it in the dishwasher for hassle-free maintenance. Cooking in a fresh kitchen has never been easier thanks to this range hood.
YJ –
This range hood served as a basic replacement for the broken NuTonerange hood that came with our house. The old NuTone unit was completely nonfunctional, prompting us to purchase this new one. The product arrived adequately packaged, with only a minor dent in the upper fold on the back of the unit that was hardly noticeable, so we opted not to request a replacement.The NuTone hood I removed had a recess in the top, and the electrical supply from the wall was positioned near the top of the unit about 3 inches over from the corner. In contrast, this unit had a completely flush top with knockouts on the top and rear, about 7 inches in from the corner. To align the power supply with the knockout, I had to cut a section of drywall behind the hood. While this wasn’t a major issue, it was a bit inconvenient.The package included instructions for a recessed cabinet installation, but the unit out of the box was designed for a flush bottom cabinet. Since my cabinets had recessed bottoms, I decided to use longer wood screws with washers to secure the range hood to the bottom shelf in the rear and smaller holes on the front lip of the hood to attach to the front fascia of the cabinet. It was essential to drill pilot holes for the screws, and a 1/8″” drill bit worked perfectly. Once the hood was hung, I made the electrical connections. Note that wire nuts were not provided, so ensure you have some on hand.Overall, the installation process went smoothly, and the unit is securely in place and functioning perfectly. The switches feel sturdy, and we added two LED bulbs and a duct pipe, improving visibility while cooking. Now, we can see what we’re cooking with ease.
Riley Parris –
I purchased this stainless steel range hood as a budget-friendly replacement for my old one that had stopped working. Since we plan to install an over-the-range microwave in the near future, I didn’t want to invest in an expensive hood. However, we needed an exhaust fan in the meantime.The installation process was incredibly straightforward. It took me less than 10 minutes, with only a couple of minutes spent walking up and down the stairs to switch the power on and off in the kitchen.When the package arrived, I found that the box had been left wide open at my door. This was a first for me with Garvee, and it initially caused some concern. However, upon close inspection, everything was in good condition. The only items in the box were the hood – which was undamaged despite the box being open – and an instruction booklet that I didn’t need to use. The mounting screws were located in a plastic bag under the wiring cover, which had to be removed during installation. Initially, I thought the screws were missing, but I later found them underneath the cover. Be sure to check under the cover for the screws!Given that my cabinets have a frame ledge that hangs down 1/2″” below the cabinet on the front and back, I had to use a 1/2″” spacer board between the hood and the cabinet or drill new holes in the hood at the front and back edges to screw into the ledges for mounting. I opted to drill new holes in the hood, using a 3/16 drill bit that worked perfectly with the included screws.I then removed the back wire tab on the hood using a flat-head screwdriver, turned off the power to the kitchen, and passed the power wires from the wall through the tab hole.With my wife’s assistance, I held the lightweight range hood up to the cabinet, ensured we were happy with the placement, and quickly secured the hood to the cabinet with the four included screws. This step took less than 2 minutes.Finally, I connected the white wires from the range hood to the white wire from the wall, the black wires to the black, and attached the ground wire from the wall to the greenish/blue screw on the hood. I then turned the power back on and tested the hood, which worked perfectly.Enjoy your new range hood!
Brittany –
I am glad to hear that the packaging of the range hood was excellent and that it arrived without any dents, scrapes, or scratches.The mounting system of this range hood is better than your previous one, and its lightweight design gives you confidence that the anchors you used are sufficient for installation.Your decision to choose this particular range hood because of the position of the lights was strategic. Having the lights in the front rather than the back provides better lighting for the stovetop, which is a practical feature.It’s fantastic to hear that this hood is much quieter than your previous one. While you haven’t tested its performance in removing smoke, steam, or odors yet, you have high hopes for its effectiveness.The fact that the covers can be easily removed and washed in the dishwasher is a convenient feature that you plan to take advantage of regularly, possibly once a week.Lastly, the digital display and touch buttons on the hood have impressed you, providing a clean and modern interface. Overall, you are very pleased with this range hood and its features.
Choi Jung Min –
I am really happy with my new range hood! It’s incredibly convenient to use, thanks to the built-in lighting, adjustable speed settings, and effective filtration.The lights make it easy to see what I am cooking, and I can adjust the fan speed depending on how much smoke and grease there is. It truly enhances my cooking experience and makes cleanup so much easier.
Jassie –
Looks good.