| Content |

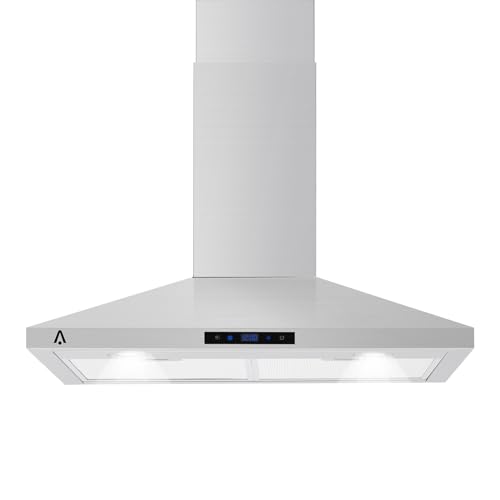
Elevate your kitchen with the ThinkMax 30 Inch Wall Mount Range Hood
ThinkMax 30 Inch Wall Mount Range Hood: Modern Efficiency Meets Style
Transform your kitchen ventilation with our powerful 265 CFM range hood. Designed for performance and elegance, it's the perfect combination of functionality and modern aesthetics.
Why Choose ThinkMax?
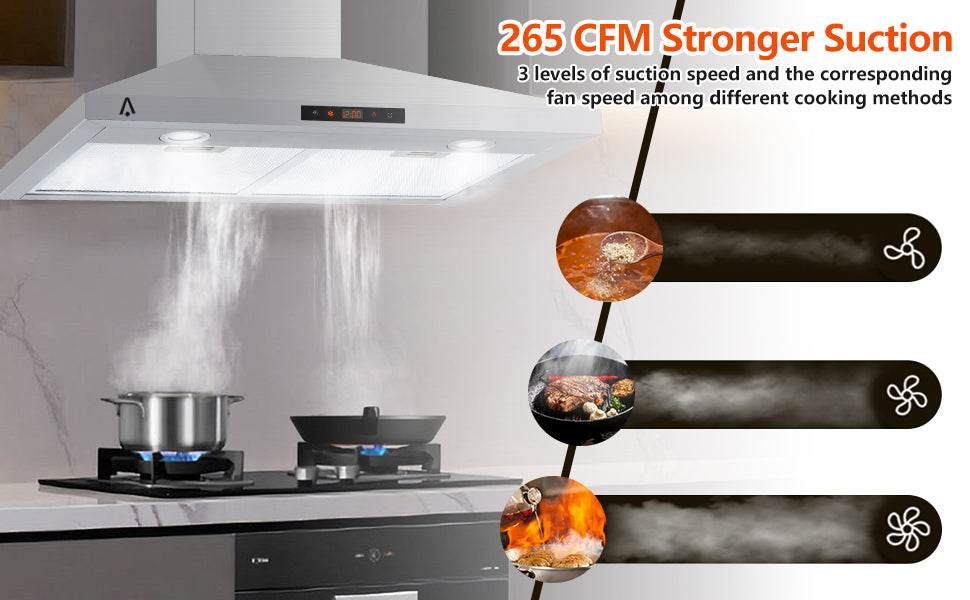
Powerful Performance
265 CFM suction power effectively removes smoke, odors, and cooking fumes, keeping your kitchen fresh and clean.
Premium Construction
Built with high-quality stainless steel for durability and easy maintenance, ensuring long-lasting performance.
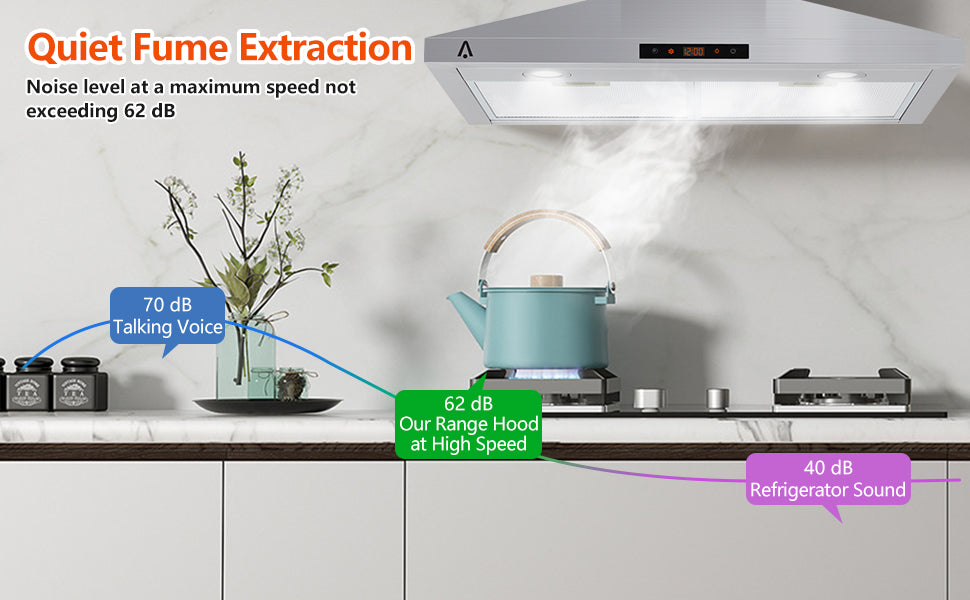
Smart Controls
3-speed touch control system with quiet operation lets you adjust ventilation to your exact needs.
Superior ventilation with modern touch controls
Features That Perform
With its sleek design, powerful suction, and quiet operation, this range hood combines performance with convenience. The stainless steel construction ensures durability while maintaining an elegant appearance.
Versatile installation options for any kitchen setup
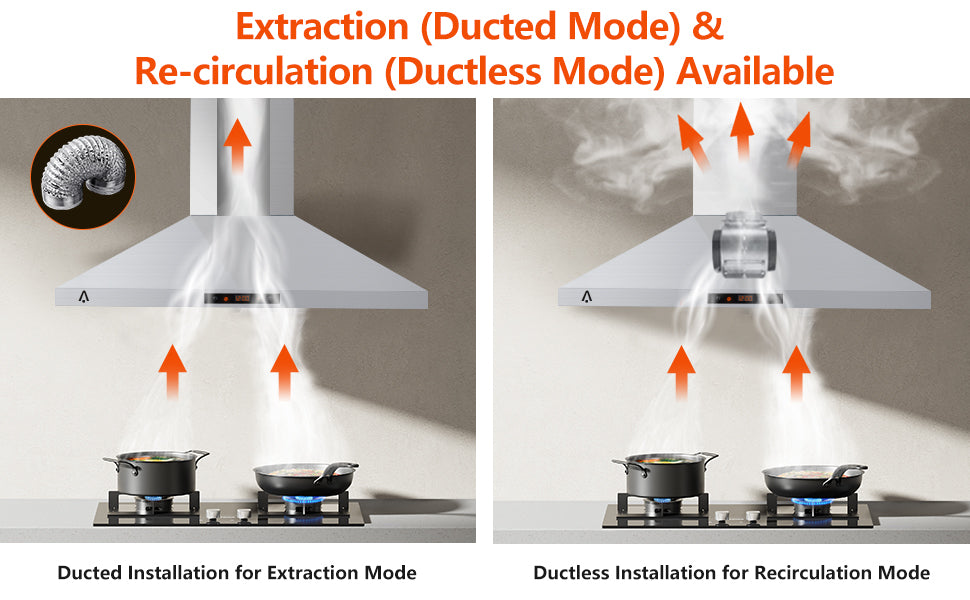
Versatile Installation
The convertible ducted/ductless venting system provides flexible installation options to suit any kitchen layout. Bright LED lighting ensures optimal visibility while cooking.
Perfect dimensions for standard 30-inch cooktops
Smart Design Meets Superior Function
Every detail has been carefully considered, from the efficient 265 CFM motor to the touch control panel and LED lighting system, creating the perfect balance of form and function.
Key Features
- Powerful 265 CFM suction for effective smoke and odor removal
- Premium stainless steel construction for durability
- 3-speed touch control with quiet operation
- Convertible ducted/ductless venting options
- Bright LED lights with dual brightness levels
- Easy-to-clean design and maintenance
- Modern aesthetic that complements any kitchen style
Experience superior kitchen ventilation
Specifications
| Brand |
ThinkMax |
| Noise |
60 dB |
| Color |
Silver |
| Voltage |
110 |
| Airflow Displacement |
265 Cubic Feet Per Minute |
| Material Type |
Stainless Steel |
| Special Features |
Stainless Steel Baffle Filters, 3 Fan Speeds, LED Lighting |
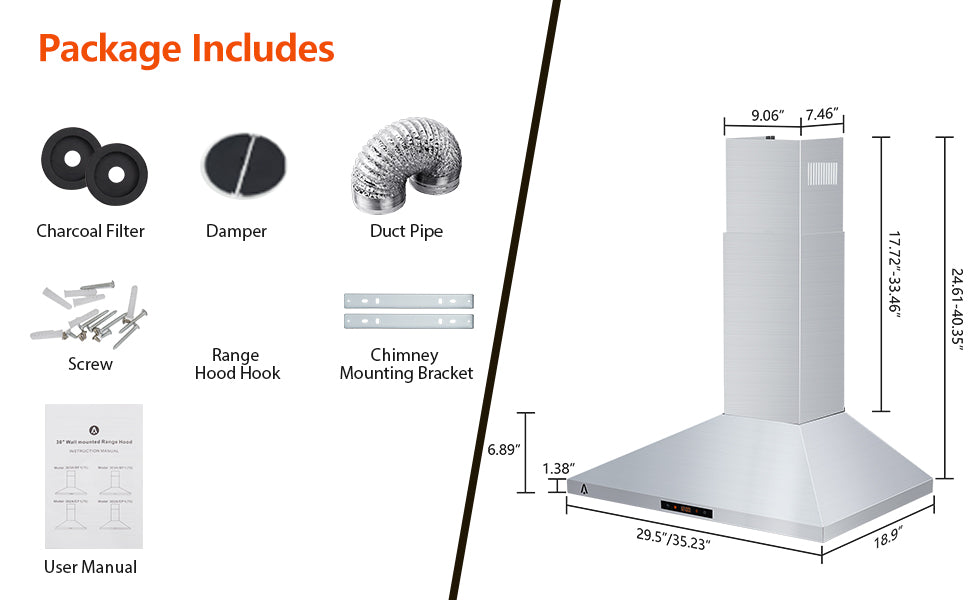
| Included Components |
1x Range Hood, 1x User Manual |
| Product Dimensions |
18.9 x 25.9 x 6.89 inches |
| Item Weight |
19.84 pounds |
|
Specifications
| Brand |
ThinkMax |
| Color |
White |
| Product Dimensions |
14.6 x 9.1 x 8.3 inches |
| Item Weight |
6.78 Pounds |
| Kit Includes |
Double Wax Warmer*1
100g Hard Wax Bean*6 Packs
Wooden Stick*100
Finger Cot*100
Hair Removal Paper*100
Anti-Mess Mat *40 |
|

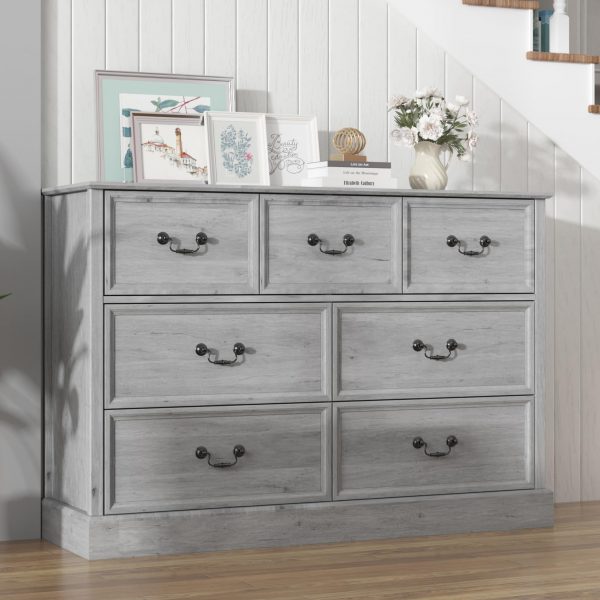
Elevate your storage with the ThinkMax White 6 Drawers Dresser
ThinkMax White 6 Drawers Dresser: Where Style Meets Function
Transform your living space with our versatile and charming dresser. Designed for both beauty and practicality, it's the perfect addition to any room in your home.
Why Choose ThinkMax?
Sturdy & Durable Construction
Built with high-quality engineered wood, ensuring long-lasting durability and stability for years of use.
Farmhouse Charm
Vintage handles and rustic design add a touch of farmhouse elegance to any room decor.
Ample Storage Space
Six spacious pull-out drawers provide generous storage for clothes, linens, or miscellaneous items.

Designed for versatility, functionality, and timeless style
Features That Impress
With its modern design, spacious drawers, and versatile functionality, this dresser combines aesthetics with practicality. The sturdy construction ensures stability and safety for everyday use.

The perfect storage solution for any room in your home
Versatile Storage Solution
The ThinkMax White 6 Drawers Dresser isn't just furniture - it's a storage powerhouse. With ample space for clothes, linens, or miscellaneous items, it provides an organized and stylish environment that will complement any room.

Perfectly sized for your storage needs
Smart Design Meets Superior Functionality
With its ergonomic design, spacious drawers, and versatile applications, the ThinkMax White 6 Drawers Dresser combines smart design with endless possibilities for storage and organization.
Key Features
- Sturdy and durable engineered wood construction
- Farmhouse charm with vintage handles
- 6 spacious pull-out drawers for ample storage
- Versatile design suitable for any room or hallway
- Easy assembly with clear instructions included
- Safety features for peace of mind
- Modern white finish complements various decor styles

Enhance your living space with style and functionality
Specifications
| Brand |
ThinkMax |
| Color |
Grey |
| Mounting Type |
Floor Mount |
| Room Type |
Bedroom |
| Special Feature |
Safety Stop |
| Assembly Required |
Yes |
| Model Name |
UdD-ImIARF6wgfaHt1I1RAyMnbc2 |
| Item Weight |
129 pounds |
| Product Dimensions |
47.2"D x 15.6"W x 32.8"H |
|

Experience professional-grade cooking with the ThinkMax 24 Inch Convection Oven
ThinkMax 24 Inch Convection Oven: Professional Cooking Made Easy
Elevate your cooking experience with our advanced convection oven. Featuring 3D heating technology and smart controls, it's designed to deliver perfect results every time.
Why Choose ThinkMax?

Spacious 2.5 Cu.ft Interior
Generous 70L capacity perfect for family meals and entertaining, with multiple rack positions for versatile cooking options.

Double-layered Glass Door
Superior insulation and safety with double-layered glass, keeping the exterior cool while maintaining even internal temperatures.

3D Surround Heating
Advanced heating technology ensures even heat distribution for perfect cooking results every time.

Smart features for intuitive cooking
Features That Inspire
With 108 smart cooking menus and intuitive touch controls, this oven combines sophisticated technology with user-friendly operation for an exceptional cooking experience.
Key Features
- Spacious 2.5 Cu.ft (70L) capacity
- 3D Surround Heating technology
- 108 smart cooking menus
- Double-layered glass door for safety
- Touch control panel interface
- 3000W powerful heating element
- Multiple rack positions
Specifications
| Brand |
ThinkMax |
| Model |
Single Wall Oven |
| Capacity |
2.5 Cubic Feet |
| Wattage |
3000 watts |
| Voltage |
240 Volts |
| Color |
Black |
| Fuel Type |
Electric |
| Cooking Mode |
Convection |
| Item Weight |
85 pounds |
| Product Dimensions |
27 x 25 x 25 inches |
| Package Includes |
24-inch single wall oven |
|
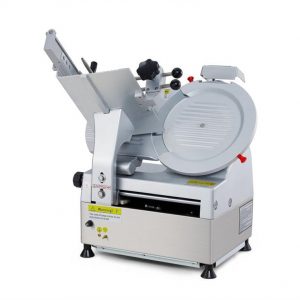
ThinkMax 550W Automatic Meat Slicer - Professional Grade Deli Slicer
Elevate Your Kitchen Game with Precision and Power!
Versatility Meets Efficiency
From frozen meats to crisp vegetables, delicate fruits to artisanal breads - the ThinkMax 550W Automatic Meat Slicer handles it all with ease. Perfect for busy delis, restaurants, or the serious home chef who demands professional results.

Built to Last
With its robust metal construction and 12-inch carbon steel blade, this slicer is designed for years of reliable service. The four anti-slip bases ensure stability during operation, while the seamless design makes cleanup a breeze.

Why the ThinkMax 550W Automatic Meat Slicer is a Cut Above the Rest
- Precision at Your Fingertips: Adjustable thickness from 0-14mm ensures perfect slices every time. Whether it's paper-thin prosciutto or thick-cut roast beef, you're in control.
- Powerhouse Performance: Dual 550W pure copper motors slice up to 300kg per hour. That's a full day's work of manual slicing done in just 60 minutes!
- Safety First, Always: Multiple protection features including blade guard, automatic meat pusher, and emergency stop button. Slice with confidence and peace of mind.
- Built-in Sharpener: Maintain a razor-sharp edge in under a minute with the integrated stone sharpener. No more dull blades or separate sharpening tools!
Product Specifications
| Specification |
Detail |
| Brand |
|
| Material |
Metal |
| Color |
Silver |
| Special Feature |
Powerful Motor, Anti-Slip, Multipurpose, Adjustable Thickness, One Button Press |
| Recommended Uses For Product |
Meat, Vegetable, Fruit |
| Product Care Instructions |
Hand Wash Only |
| Blade Material |
High Carbon Steel |
| Blade Shape |
Round |
| Blade Length |
12 Inches |
| Operation Mode |
Automatic |
| Dimensions |
21.5"L x 18.5"W x 26"H |
| Weight |
122.7 pounds |
Transform your food preparation process today. Whether you're a professional chef or a home cooking enthusiast, the ThinkMax 550W Automatic Meat Slicer will revolutionize your kitchen experience.
|

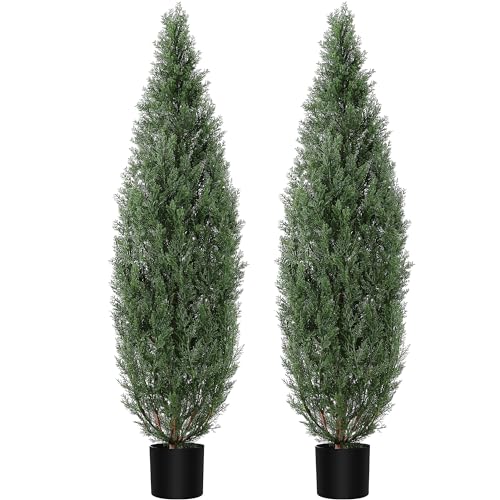
Enhance your space with the ThinkMax Artificial Topiary Tree 2-Set
ThinkMax Artificial Topiary Tree 2-Set: Elegance Meets Convenience
Transform your indoor or outdoor space with our stunning 5ft Artificial Cedar Topiary Trees. These maintenance-free beauties offer the perfect blend of realism and practicality, bringing nature's charm to your decor without the hassle.
Why Choose ThinkMax?
Realistic Design
Our artificial cedar trees boast a true-to-life look, fooling even the keenest eyes with their lifelike appearance.
Maintenance-Free
Enjoy the beauty of nature without the upkeep - no watering, pruning, or special care needed.
Versatile Use
Perfect for any setting - from gardens and patios to living rooms and offices, these trees adapt beautifully to any space.

Perfect for both indoor and outdoor decoration
Features That Impress
With their generous size of 60.6 inches in height and 16.3 inches in width, these artificial topiary trees make a bold statement. The 5.7-inch pot provides stability, ensuring your decor stays put in any environment.

Bring a touch of nature to your indoor spaces
Effortless Elegance
The ThinkMax Artificial Topiary Tree 2-Set arrives ready to display, with no assembly required. Simply place them in your desired location and instantly elevate your decor with their lush, evergreen beauty.

Exquisite details for a truly lifelike appearance
Long-Lasting Beauty
Our artificial topiary trees are crafted with UV-protected materials, ensuring they maintain their vibrant green color and realistic appearance for years to come, whether placed indoors or outdoors.
Key Features
- Realistic design with a true-to-life look
- Maintenance-free, no watering needed
- Versatile for garden, patio, home, and office use
- 60.6 inches tall, 16.3 inches wide, with a 5.7-inch pot
- No assembly required, ready to install
- UV protection for longer life and color retention
- Suitable for both indoor and outdoor decoration
Transform your space with the ThinkMax Artificial Topiary Tree 2-Set
Specifications
| Brand |
|
| Color |
Green |
| Shape |
Cedar Topiary |
| Material |
Polypropylene (PP) |
| Tree Height |
60.6 inches (5 ft) |
| Tree Width |
16.3 inches |
| Pot Size |
5.7 inches |
| Suitable Use |
Indoor and Outdoor |
| Special Features |
UV Protection, No Assembly Required |
| Set Includes |
2 Artificial Cedar Topiary Trees |
|


Shinneen Muir –
The 5-layer aluminum filter is a game-changer – it effectively traps grease and eliminates cooking odors. I love how easy it is to clean, simply pop it in the dishwasher for hassle-free maintenance. Cooking in a fresh kitchen has never been easier thanks to this range hood.
YJ –
This range hood served as a basic replacement for the broken NuTonerange hood that came with our house. The old NuTone unit was completely nonfunctional, prompting us to purchase this new one. The product arrived adequately packaged, with only a minor dent in the upper fold on the back of the unit that was hardly noticeable, so we opted not to request a replacement.The NuTone hood I removed had a recess in the top, and the electrical supply from the wall was positioned near the top of the unit about 3 inches over from the corner. In contrast, this unit had a completely flush top with knockouts on the top and rear, about 7 inches in from the corner. To align the power supply with the knockout, I had to cut a section of drywall behind the hood. While this wasn’t a major issue, it was a bit inconvenient.The package included instructions for a recessed cabinet installation, but the unit out of the box was designed for a flush bottom cabinet. Since my cabinets had recessed bottoms, I decided to use longer wood screws with washers to secure the range hood to the bottom shelf in the rear and smaller holes on the front lip of the hood to attach to the front fascia of the cabinet. It was essential to drill pilot holes for the screws, and a 1/8″” drill bit worked perfectly. Once the hood was hung, I made the electrical connections. Note that wire nuts were not provided, so ensure you have some on hand.Overall, the installation process went smoothly, and the unit is securely in place and functioning perfectly. The switches feel sturdy, and we added two LED bulbs and a duct pipe, improving visibility while cooking. Now, we can see what we’re cooking with ease.
Riley Parris –
I purchased this stainless steel range hood as a budget-friendly replacement for my old one that had stopped working. Since we plan to install an over-the-range microwave in the near future, I didn’t want to invest in an expensive hood. However, we needed an exhaust fan in the meantime.The installation process was incredibly straightforward. It took me less than 10 minutes, with only a couple of minutes spent walking up and down the stairs to switch the power on and off in the kitchen.When the package arrived, I found that the box had been left wide open at my door. This was a first for me with Garvee, and it initially caused some concern. However, upon close inspection, everything was in good condition. The only items in the box were the hood – which was undamaged despite the box being open – and an instruction booklet that I didn’t need to use. The mounting screws were located in a plastic bag under the wiring cover, which had to be removed during installation. Initially, I thought the screws were missing, but I later found them underneath the cover. Be sure to check under the cover for the screws!Given that my cabinets have a frame ledge that hangs down 1/2″” below the cabinet on the front and back, I had to use a 1/2″” spacer board between the hood and the cabinet or drill new holes in the hood at the front and back edges to screw into the ledges for mounting. I opted to drill new holes in the hood, using a 3/16 drill bit that worked perfectly with the included screws.I then removed the back wire tab on the hood using a flat-head screwdriver, turned off the power to the kitchen, and passed the power wires from the wall through the tab hole.With my wife’s assistance, I held the lightweight range hood up to the cabinet, ensured we were happy with the placement, and quickly secured the hood to the cabinet with the four included screws. This step took less than 2 minutes.Finally, I connected the white wires from the range hood to the white wire from the wall, the black wires to the black, and attached the ground wire from the wall to the greenish/blue screw on the hood. I then turned the power back on and tested the hood, which worked perfectly.Enjoy your new range hood!
Brittany –
I am glad to hear that the packaging of the range hood was excellent and that it arrived without any dents, scrapes, or scratches.The mounting system of this range hood is better than your previous one, and its lightweight design gives you confidence that the anchors you used are sufficient for installation.Your decision to choose this particular range hood because of the position of the lights was strategic. Having the lights in the front rather than the back provides better lighting for the stovetop, which is a practical feature.It’s fantastic to hear that this hood is much quieter than your previous one. While you haven’t tested its performance in removing smoke, steam, or odors yet, you have high hopes for its effectiveness.The fact that the covers can be easily removed and washed in the dishwasher is a convenient feature that you plan to take advantage of regularly, possibly once a week.Lastly, the digital display and touch buttons on the hood have impressed you, providing a clean and modern interface. Overall, you are very pleased with this range hood and its features.
Choi Jung Min –
I am really happy with my new range hood! It’s incredibly convenient to use, thanks to the built-in lighting, adjustable speed settings, and effective filtration.The lights make it easy to see what I am cooking, and I can adjust the fan speed depending on how much smoke and grease there is. It truly enhances my cooking experience and makes cleanup so much easier.
Aurora Stevens –
The ductless option was perfect for my setup. No need for complicated venting. Just plug it in and enjoy the clean air.
Sarah Gray –
The LED lights are bright and help me see the stove better while cooking. The three-speed settings give me flexibility depending on what I’m making.
Penelope Lee –
It took some time to install, but the instructions were clear. Once up and running, the performance was exactly what I expected from a quality product like this.
Layla Harris –
Compared to other models I’ve seen, this one offers great value for the price. It¡¯s sturdy, well-made, and performs reliably every time.
Gabriel White –
This hood fits perfectly over my 30-inch cooktop. It¡¯s stylish, efficient, and has become a favorite feature in my kitchen.
Lila Porter –
The stainless steel finish resists fingerprints and is easy to wipe down. It looks sleek and matches my kitchen appliances well.
Matthew Price –
I had concerns about noise, but the 60 dB rating is accurate. It runs quietly and doesn¡¯t disturb conversations or TV.
Leo Long –
I appreciate the dual brightness LED lighting. It¡¯s not too harsh during the day and provides enough light for nighttime cooking.
Oliver Hall –
Great product overall. The build quality is excellent, and the performance is consistent. Definitely worth the investment for any kitchen upgrade.
Hannah King –
The three fan speeds are handy when cooking different types of food. It adapts well to various cooking needs.
Wyatt Taylor –
The touch control panel is intuitive and responsive. I especially like the dual brightness settings for the LED lights ¡ª it adds a nice touch to evening meals.
Daniel Thompson –
I was impressed with how easy it was to install. The stainless steel build looks great and feels durable. It’s also very quiet at high speed, which is a big plus.
Nicholas Young –
I didn¡¯t expect such good suction power for the price. It removes all the smoke from frying and keeps the air fresh.
Victoria Murphy –
I¡¯ve used several range hoods before, and this one stands out for its modern design and strong suction power. It really does make my kitchen feel cleaner.
Joshua Hayes –
It¡¯s a bit heavy, but the build quality justifies the weight. Everything feels solid and built to last.
James Cooper –
I¡¯m happy with the quiet operation. Even at the highest setting, it doesn¡¯t create too much noise. That makes cooking more enjoyable.
Harper Rodriguez –
This range hood is a game-changer for my kitchen. The 265 CFM suction is powerful enough to clear smoke and odors quickly. I love the touch controls and LED lighting.
Evelyn Ward –
The touch interface is smooth and user-friendly. It¡¯s a pleasure to use every day and gives a modern feel to the kitchen.
Julia Martinez –
This range hood exceeded my expectations. It¡¯s functional, stylish, and improves the overall cooking experience in my home.
Stella Morales –
Installation wasn¡¯t tricky thanks to the clear manual. The LED lighting is a nice bonus that enhances the look of my kitchen.
Jassie –
Looks good.